 | Hello Guest - Sign In or New Account |
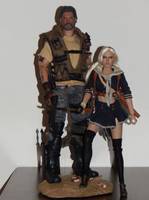
This custom figure was the result of one of those “happy creative accidents”. A year or so ago, I’d put together a very basic custom Terminator. I’d gotten the Hot Toys TTM-20 body and a non-HT Schwarzenegger head as the base. I took the extra boots, socks, pants, and belt from my HT E2 Barney Ross and gave him the extra T-shirt from my HT Roadblock. It was a very bare bones approach … and it was obvious. I was very disappointed by the results because it was just too plain and boring. No character or personality. I wound up just putting it away in a drawer because I didn’t even like it being on display. Every now and then, I would revisit it and brainstorm about what I could do to make it interesting. I’ve tweaked existing character’s looks before by adding additional accessories or items of apparel. So, I regularly tried to take that same approach to it to try to come up with something I liked. Did it need some nice weapons? Was the outfit the problem? Would a better head sculpt make a difference? Those types of things. But, overall, I still had in my mind that it was supposed to be a Terminator. All of my brainstorming was therefore being done with that in mind. A couple months ago, I was dusting. And, one of the items I had to dust was my Sideshow Jim Raynor figure. I’ve never played Starcraft and didn’t know anything about the character itself … but, I absolutely loved the armor. When I had an opportunity to get the figure for a really good price, I jumped at it. Once I had it, I quickly encountered a situation I never expected to be in. The skull helmet look was a key visual that I loved about the armor design. What I hadn’t expected … especially from SS … was that it would come with an awesome head sculpt for the character. What ensued was a long debate about how I’d display him. Mask … helmet with visor up … or helmet off. Ultimately, the skull mask won out. Well … the day I was dusting it, I managed to knock off the face within the helmet. Hadn’t really thought about that … so it was a little surprising. But, when I opened the visor to get it out so I could put it back in place, I again found myself looking at the face sculpt and thinking how detailed it is, what a shame it was that it had to be hidden behind the visor, and that it would have been really cool if SS had made a regular Jim Raynor figure outside of the armor. That last thought suddenly made me think of that failed custom figure. I got it out of the drawer and just held the Raynor face over the Schwarzenegger head. I was amazed at how much difference a “face with detailing and character” actually made to the same basic outfit. It wasn’t long before I was suddenly very curious if I could actually make my own Jim Raynor figure. I went online and searched to find out what his character looked like outside of the armor. Found a few fan pictures that I thought were really cool … and started breaking it down to the core components to see what it would take to not just make a figure that I’d call Jim Raynor but to have it be a clearly unique figure that didn’t look like I had to kitbash it. I sat down, examined the various pictures I’d downloaded, and started coming up with a list of parts. I identified which parts were the “core” parts to define the basic character’s look … and which parts were additional parts that could further refine it (secondary, tertiary, etc.). The purpose of this was to prioritize the order in which I’d get the parts. I couldn’t get everything all at once … but before I spent money on some of the accessories (which tended to be more expensive than core pieces), I wanted to be sure that my plan was working and that it was turning out the way I wanted. If the plan wasn’t working out and things weren’t looking right, I could pull the plug whenever I wanted. I'd learned that lesson from a disastrous and expensive attempt to make a custom Death's Head figure. I already had the head (which was the most critical part) and the body. Next up were the vest or harness with t-shirt … big futuristic or mecha-style combat boots … camouflage pants … and hands featuring fingerless gloves with built-in wristbands (for fingerless gauntlets). Without these core things, I knew he wouldn’t look right. So, I set about searching what pieces I could use for each. While the actual assembly of the figure didn’t take long … finding the individual components that ultimately went into him took dozens of hours. My main overriding rule for this project was for the end result to be a Hot Toys figure. I knew I was setting the bar high … but that was what I was aiming for. Not everything had to be from HT … but I wanted the vast majority of stuff to be HT. I’ve had problems before with clothing items that didn’t fit the body I tried to put them on … which always wound up with the items being torn/damaged because they were too small. A very frustrating thing to happen. And, with the base body already being a heavy muscular body, I knew that even other HT items wouldn’t necessarily work. I had to specifically look for HT items intended for the muscular body base instead of the regular or the thin bases. So any item I found I had to research to see if it actually had that base body and would therefore fit. As I was putting him together, I would literally download a picture, resize it to be 1:1 scale, and then hold the figure up to the image on the monitor to see if what I was looking at would work or if it was going to be too small. I chose the boots first. While I had strongly considered Zod’s boots, I wound up going with the boots from the Batman Arkham City figure. I preferred them being solid instead of something designed to fit over the underlying “tights” like would be the case with Zod. Next up was the thing I actually thought I’d have the most problems finding … the blue/gray camouflage pants. Most I saw were traditional green/tan camouflage or just plain olive green. But, then I discovered that the Falcon figure from The Winter Soldier movie had pants that would work. I liked the additional padding detail too. What to put over a t-shirt was the next challenge. I didn’t know whether it was technically a “vest” or a “harness” or just fancy “holsters”. So, I searched for pretty much everything I could think of to see if a single item or a combination of items could give me the look I wanted. When I stumbled upon the flack vest for the new Briareos figure from Appleseed Alpha, I was thrilled. I knew it was much more substantial than what Jim Raynor wore in the various pictures I’d seen. The pictures focused on the t-shirt … and this would be actual armor over the t-shirt. But, I just loved all of the details of this flack vest. Decided that this was my interpretation of this character … and that this was where I’d use some artistic license in my selections. The t-shirt was another choice I stumbled upon. I didn’t want a black t-shirt or anything fitted. I didn’t like any white t-shirts I was seeing … and the grey ones for the Terminator were more expensive than I really felt like spending for just a t-shirt. Then I stumbled upon Noland’s tan t-shirt from Predators. It was a good, military color … and, because it was designed to look “well-worn”, it had a lot of nice details (ragged/frayed edges and a hole in the back of the neck) to show that this was a t-shirt he’d been using for a while. The hand/gloves wound up being from the Age of Ultron Captain America. It was interesting how his previous figures just had gloved hands … and this was the one that went further and gave him gauntlets. And, the presence of the metal magnets on the back of the gloves gave another interesting visual detail that I liked. It was fun as those items arrived one-by-one … and I got steady confirmation that it was working out well. Each piece took him one step closer to the goal. I especially liked when I saw that, as I had hoped, this would be a large-sized figure. The final height of 13” makes him the equivalent of a 6’6” man. I wanted him to be nearly the size of a Spartan … but not quite as tall. This was right where I was aiming for. From there, I started working on the secondary items. Weapons were up first. I knew I wanted him to have a big, over-sized pistol … and a cool, futuristic looking rifle (I liked that look in the pictures of the DC Unlimited figure I’d seen). It didn’t take me long to find the blaster rifle that Black Widow had from Age of Ultron. The pistol was trickier. For the longest time, I thought it might have to be the submachine gun from Blade II, a revolver from Inflames Toys Cowboy From Hell, or a Robocop pistol. Was also looking at ThreeA since the Berties had large revolvers. I stumbled upon the grenade launcher pistol from John Connor Final Battle version. That had the right look and size that I was looking for. And, thankfully, both the pistol and the rifle’s handle and grip designs worked with two of the CA’s hands that were designed to catch something (since he didn’t have actual pistol-grip hands). I did turn to ThreeA for the belts and pouches. Specifically TQ Irimi Natsu. Found those when looking for guns and holsters. Besides being leather-look, they were all heavily adjustable. So, I could switch the pouches and belts around as I wanted to based on how they could be adjusted. Two belts and 2 pouches were added to his left thigh and spread out to cover more space. The remaining pouches were added to the largest belt so he’d have a large pouch and small pouch on each hip. The last small belt was saved for my next fun find: the bandanna. For the longest time, I thought I’d have to just use a plain one … which I wasn’t thrilled about. I understood from the character research that the skull-and-crossbones bandanna had meaning. A plain one wouldn’t have that. I considered getting a skull-and-crossbones pattern fabric to make the bandana but couldn’t find anything in-scale. So, I thought I'd have to go with a plain black one. But, then I found the scarf from Damtoy Gangsters Kingtom Diamond 4 (when I was looking at daggers). It did still contain a few skull-and-crossbones images on it … but, like Briareo’s flack vest, I liked all of the other visual detailing it came with. The last small belt was used with the bandanna to hold it in place (just like some of the Jim Raynor images I’d seen). Getting back to weapons, I wanted a good boot knife … but couldn’t find any designs I liked. So, I expanded it to other knives and daggers and even short swords. I liked the concept of a AVP Predator dagger … but knew the look wouldn’t blend in right. Found the AF-18 “Boy Black” (Riddick from “Pitch Black”) dagger that fit the bill. Both alien in design for the dagger … as well as a sheath that would match the boots. It was designed for a much smaller leg … and certainly not a heavy boot … so the existing leg straps were too small. And some transparent putty I tried to use to keep the sheath on the belt wouldn’t hold. I had to cut off the existing straps and picking up some black leather “Latigo lace” from Michaels to make my own straps that I could glue together and slip onto the boots. To extend the visual look of the boots … and to cover up the small built-in knee pads in the pants … I got the armored knee pads from Wolverine (Days of Future Past). Each knee pad set is different. So, the set that fit together better I put on the right knee … and the other set that had the gap I put on the left knee where it would be covered up by the bandana. I plan to put a set of small dogtags on him (only thing I haven’t gotten yet and I keep forgetting about them). But, two cases of “now we’re just adding the icing to the cake” was finding some 1/6 scale packs of cigarettes … and some biker-themed tattoo decals so that his bare arms wouldn’t be so bare after all. The final touch was also unexpected. I didn’t like him on just a plain HT-style stand. So, I’d been looking at stands and dioramas to see what would go well with the character. I wasn’t finding anything that I liked. When I was at Michaels to get the leather and dull clearcoat for the decals, I came across the cans of textured paint. I really liked the idea of the sand one … but didn’t think it would look right to just use it on the plain HT-style stand. Then I remembered I had the Asmus Nazgul Lord and his stand. So, I gave the Nazgul Lord the HT-style stand so I could use the fancier stand for this. That … especially with the packs of Marlboros scattered across the ground … was exactly what I was looking for. The pictures I’m posting show how he compares to the different sizes of figures. His armored look … a regular-sized male figure (SS Deadpool) and a petite female figure (HT Babydoll). It was cool “Happy New Year!” project to complete. Used to look at a lot of the custom figures on this website years ago … and was cool to finally be able to post something myself for the first time. Thanks for looking! Summary of Recipe: -- Body -- Hot Toys TTM20 -- Head -- Sideshow Jim Raynor (face plate and head piece for helmet-less display) -- T-shirt -- Hot Toys Predators Noland -- Flack vest -- Hot Toys Briareos -- Hands -- Hot Toys MMS281 Avengers Age Of Ultron Captain America -- Pistol -- Hot Toys Final Battle John Connor grenade launcher -- Rifle -- Hot Toys Age of Ultron Black Widow Rifle/Blaster -- Belts w/ pouches -- ThreeA TQ IRIMI NATSU -- Pants -- Hots Toys Captain America Winter Solder Falcon -- Knee pads -- Hot Toys Days of Future Past Wolverine -- Scarf/Bandanna -- Damtoy Gangsters Kingtom Diamond 4 -- Boots -- Hot Toys Batman Arkham City -- Boot Knife -- Art Figures Boy Black AF-018 -- Knife straps -- ArtMinds Latigo Lace (black) + Loctite Super Glue -- Tattoos -- online merchant ("Snake wings and skull pack") + Testers Dullcoat Spray Lacquer -- Dog tags -- Dragon DID WW2 -- cigarette packs -- online merchant (4-pack) -- Stand -- Asmus Toys Nazgul Lord  |
| Cupid |  | Submission Order |  | Gambit |
| Zerg Edge of Tomorrow | | Starcraft Series | | James Raynor |
| None | | Created by OneHitWonder2K16 | | None |


 Update Your Custom