Painting Effectively Custom Tutorial
Covers common painting techniques and how to do them.

Please wait...
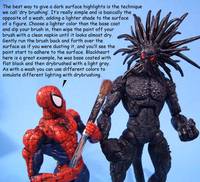
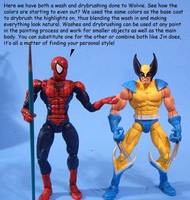
Welcome to my newly revised painting guide! Before we jump into it, take a moment and think 'comic book' in your mind. Upon each page you'll see different shades of color, shadows, sparkling highlights, and all the details that the artists convey while drawing their characters. You're going to do the same thing, but on a 3D object. Let's say you want to paint Deadpool's colors. Don't just think "I'm going to paint him red and black." Think about the different shades of red his suit would be in the comic. Remember you're painting something that's only about 6 inches tall so you won't get the shading and details unless you paint it on, just like you’re painting a picture on canvas.
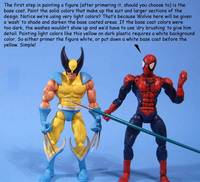
Preparation is also needed. You can't just take a figure out of the package and start painting it. You need to wash your figure with warm soapy water first. When a figure is made in the factory they use an oily lubrication on the plastic so the joints don't lock up. This stuff will keep your paint from sticking to the figure and you need to remove it first. I suggest using Ivory or Dial liquid soap and a soft nail brush to get in between the joints. Remember your action figure was designed to withstand being flushed down the toilet by a 3-year old, washing it won't hurt it a bit. Your next choice is to primer the figure or just paint over the factory paint. Depending on your preference, either can be done. I don't bother with primer but if you want to use it, the high quality sandable automotive primer won't make your plastic tacky and works great. Krylon and Plasticote are good brands of sandable automotive primer. Ok, think you're ready now? Then let's begin!
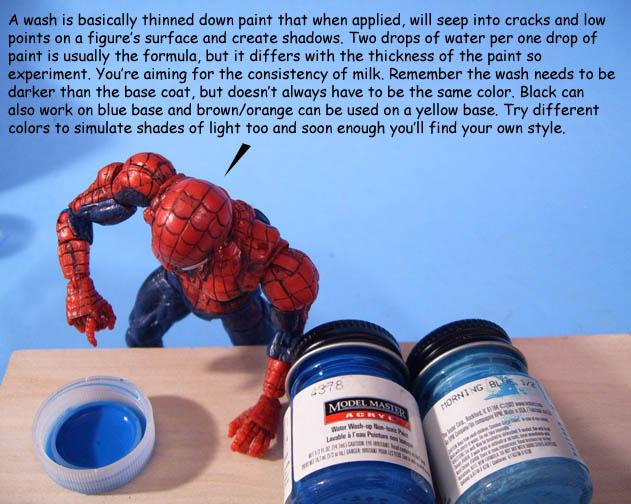
Important Painting Tips!
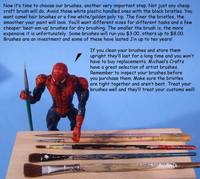
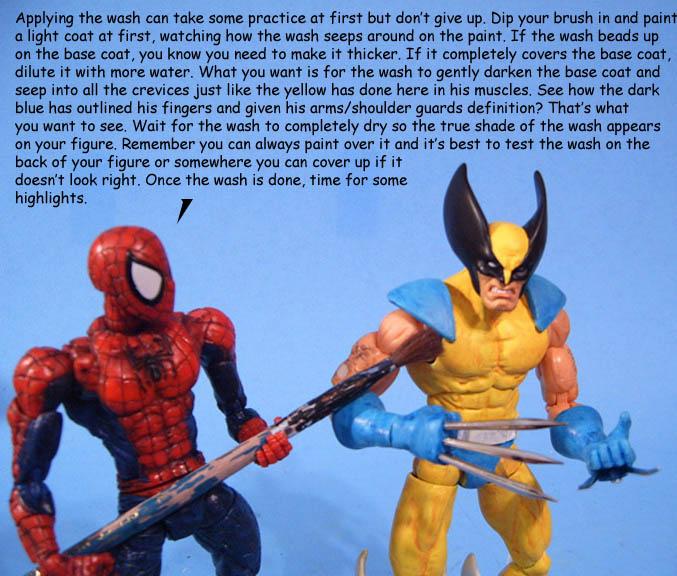
Use multiple thin coats instead of one thick coat. This not only gives a super smooth look to the finished product, it also helps with durability. Thinning your paint is easy, just add a few drops of distilled water and mix them up really well. I give all my figures 2-4 coats depending on how much the base color shows through. This will give you super clean paint applications too on details sections like eyes, lips, etc.
Stir your paints well each time you use them if they become separated. I use the other end of my paintbrush with colors like skin tones, yellows, all metallics, and earth colors. Many testors base colors like black/white/red/blues don't separate easily, but I still give those a shake. Avoid shaking paints that you can see where they've separated and become watery. Stir those first and then shake them, otherwise you could end up with bubbles on your figure.
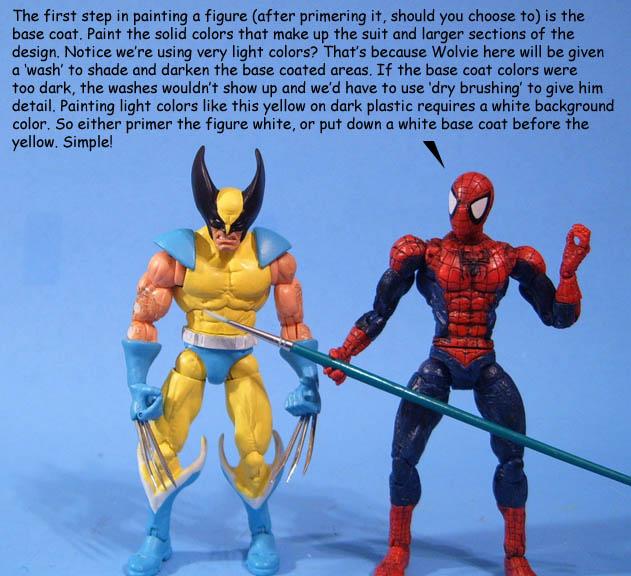
When using a lighter color than the base figure (say yellow on top of a black Bullseye body) put a couple coats of Dragon White down as a base coat or primer the figure white. Colors will take on whatever is underneath them, and unless you're going for a really dark color, white or a very light grey is the best base coat over a dark plastic.
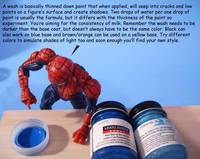
A small drop of rubbing alcohol in a wash can help the wash stick to the figure better if you find the wash is beading up on the surface. The alcohol helps break the surface tension of the wash so it adheres better in some cases.
When trying to paint flesh, again use thinned paints. Start with a base coat of Testors Light Flesh (my favorite), Centaur Flesh, or Base Tint Flesh Tone. Then do a wash of Testors Skin Tone Tint Warm over that and see how it dries. Another option is to mix some Burnt Sienna in with the original flesh tone and make a wash of that to put over the base flesh color. Either way you're looking to deepen the color of the flesh by use of a wash. Mixing some green in with the flesh helps with Italian skin tone, and some orange helps with a tan tone. I keep about 8 different flesh tones from Testors and Games Workshop on hand for mixing.
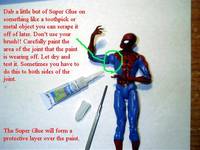
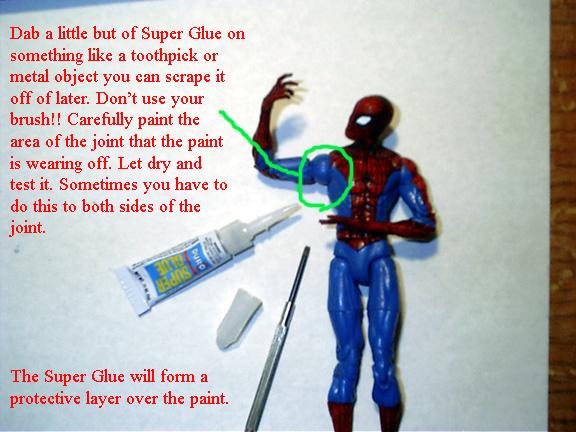
Protecting Joints
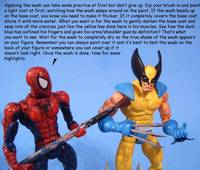
Sometimes the paint wears off from between a joint or surface where the plastic rubs together. When this happens you can either sand between the joint or use the Super Glue method. Using Super Glue always requires care. Paint the surface of the joint and let it dry thoroughly. With a toothpick or something disposable dab some Super Glue onto the surface and spread it around. Be careful not to apply too much pressure or you can glue your applicator to the paint! Also make sure you don't spread the glue into any joints. The Super Glue method is also the most durable way to protect the paint where two areas rub together like the inner thigh and crotch of a figure, or under the arms. This time you apply Super Glue to both areas to form a protective shell.
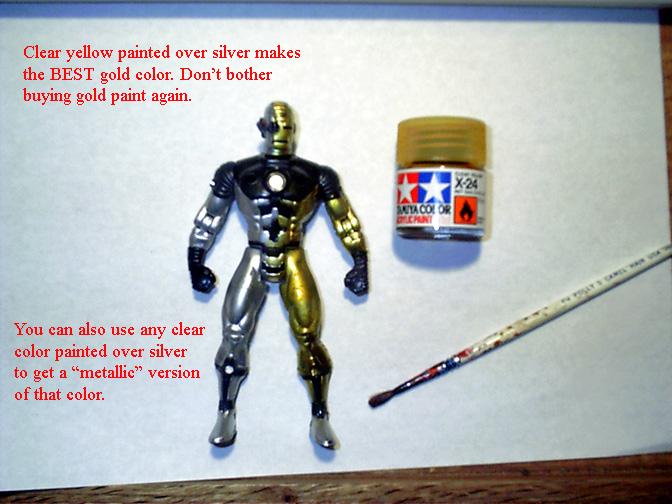
Gold Paint
Here's a neat tip. Don't buy gold paint. Really, there's a way to make a much better metallic gold than the paints sold on the shelf. Go out and buy some Clear Yellow paint. Both Testors and Tamiya make it. Base coat the object silver (Testors Argent Silver works great) and let it dry completely. Paint over the base coat with the clear yellow paint and you'll have the best looking gold this side of the Aztecs.
Well that's about it! Remember all these techniques I've showed you can be used together to obtain the ultimate in Customized Figures! Experiment with different shades and effects, there's a million different ways to paint.
Disclaimer
Customize at your own risk!
Customizing can be a fun, but dangerous hobby. These tutorials are contributed by other customizers. Some of the things recommended in the tutorials may be dangerous, such as the use of boiling water or sharp objects. You shouldn't attempt anything mentioned without adult permission and supervision. Figure Realm and/or the authors of the tutorials are not liable for any injuries or damages occurring from any attempt to follow suggestions in these tutorials.
User Comments
Custom on eBay
Previous / Next Custom Tutorial


![Painting Effectively Custom Tutorial Picture #8 [Important Painting Tips!]](userimages/customtutorials/100/thumb_33-8.jpg)
![Painting Effectively Custom Tutorial Picture #9 [Protecting Joints]](userimages/customtutorials/100/thumb_33-9.jpg)
![Painting Effectively Custom Tutorial Picture #11 [Gold Paint]](userimages/customtutorials/100/thumb_33-11.jpg)
 Update Your Tutorial